¶ Introduction
Welcome to the world of AutoShip, where convenience meets efficiency. Designed to simplify inventory management, AutoShip offers your reps and customers the seamless experience of receiving inventory items at a frequency that suits their needs, whether it's monthly, bi-monthly, or annually.
While the name implies automation, it's essential to understand that running AutoShip requires a deliberate action to process orders. Typically performed on a daily basis, running AutoShip involves the creation of orders and the processing of payments. In this article, we'll guide you through the essential steps of running AutoShip and demonstrate how to process credit card payments efficiently through the AutoShip department.
Continue on to learn about the details of AutoShip, empowering you to optimize your inventory management processes and enhance the experience for both your reps and customers. Let's embark on this journey together to unlock the full potential of AutoShip.
¶ Add To AutoShip (back office)
To add an inventory item to a representative's AutoShip profile, start by navigating to the representative's page in the back office. Then, locate and click on Autoship from the left-side menu. This action will take you to a page displaying all of the current and cancelled AutoShip profiles. Click on the AutoShip profile to which you want to add an item. Next, click the Edit button. You'll be directed to a page where you'll find a list of items that can be added to the AutoShip profile. Simply adjust the quantity next to the desired item from "0" to your preferred quantity. Once done, save your changes.
You can remove items from the Autoship profile by changing the quantity to 0.
¶ AutoShip Pricing
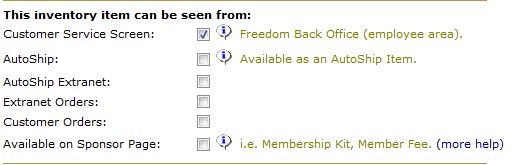
These checkboxes determine where the Inventory Items will be displayed and who can purchase them from the Shopping Cart.
-
Customer Service Screen: always choose this so Customer Service (back office) can order manually.
-
AutoShip: the item will be able to purchase as an Autoship item. Always check AutoShip Extranet too if you want it displayed on the Shopping Cart. Otherwise it will just be available to CS.
-
AutoShip Extranet: this and AutoShip must be checked for the item to display as an AutoShip item in the Shopping Cart, Web, Internet, and Replicated Sites.
-
Extranet Orders: allows the item to be seen on the Shopping Cart, Web, Internet, Replicated site for Reps.
-
Customer Orders: Customers can see and purchase the Item. Always check Extranet Orders if you want them to be able to purchase from Shopping Cart, Web, Internet, or Replicated Sites. If you check this and leave Extranet Orders unchecked, then only CS can order the item for customers.
-
Available on Sponsorship Page: This is available as a sign up option.
¶ Customer Pricing
A customer, by default, is presented with a retail price for an item listed in the shopping cart. However, depending on the product, the product can be priced at a retail, wholesale, or Preferred Customer price.
To configure Autoship pricing for customers, first set the autoship price of the inventory item. This will have many different price rows for each customer type that are based on the owning rep's rank. If needed, each price row can have a different autoship price.
See Inventory Prices.
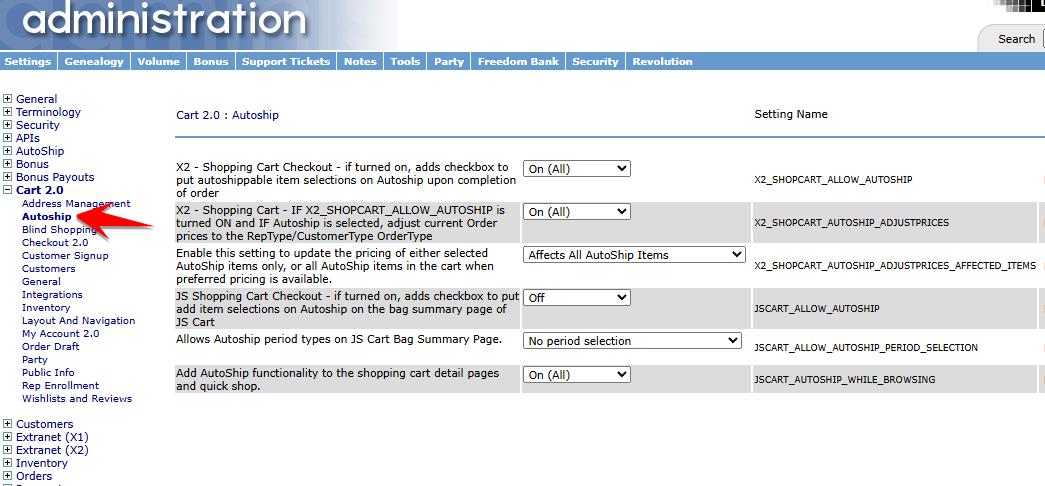
Then, you would need to enable Autoship pricing in Freedom Settings under Cart 2.0 > Autoship.
This would then use the autoship pricing based on the customer’s current customer type.
¶ Troubleshooting
There can be many reasons why the price remains at Retail and not, for instance, the Preferred Customer pricing.
-
The price is not updated in the shopping cart until the update order button is pressed. Press update to refresh the prices.
-
The customer needs to be a Preferred Customer. Check the customer type in Back Office > Customers > Edit Customer, Type: Preferred Customer.
-
The product needs to have a Preferred Customer price. Back Office > Inventory. Select the product, verify that there is a price of type Preferred Customer.